Geofence
Using Geo-fencing, the Monitoring Center can be informed of whether a Checkpoint is scanned by the Guard within its pre-defined area or not!
You can manage Geo-fencing for some checkpoint by following the steps below:
- Navigate to Company -> Checkpoints
- Select the target checkpoint from the list of available checkpoints, and press the “Edit” link
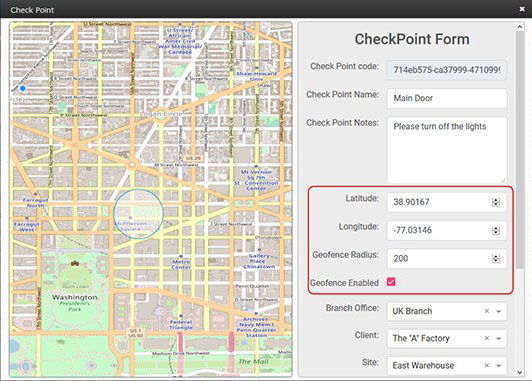
- Define the coordinates and radius of your checkpoint; you can do that by using the text fields or the map area.
Note: Various factors should be considered when setting the radius: the Guards device location accuracy, the checkpoints’ physical location (surroundings, buildings, terrain..) etc – so you may have to tune this value accordingly!
/*! elementor - v3.16.0 - 14-09-2023 */ .elementor-column .elementor-spacer-inner{height:var(--spacer-size)}.e-con{--container-widget-width:100%}.e-con-inner>.elementor-widget-spacer,.e-con>.elementor-widget-spacer{width:var(--container-widget-width,var(--spacer-size));--align-self:var(--container-widget-align-self,initial);--flex-shrink:0}.e-con-inner>.elementor-widget-spacer>.elementor-widget-container,.e-con>.elementor-widget-spacer>.elementor-widget-container{height:100%;width:100%}.e-con-inner>.elementor-widget-spacer>.elementor-widget-container>.elementor-spacer,.e-con>.elementor-widget-spacer>.elementor-widget-container>.elementor-spacer{height:100%}.e-con-inner>.elementor-widget-spacer>.elementor-widget-container>.elementor-spacer>.elementor-spacer-inner,.e-con>.elementor-widget-spacer>.elementor-widget-container>.elementor-spacer>.elementor-spacer-inner{height:var(--container-widget-height,var(--spacer-size))}.e-con-inner>.elementor-widget-spacer.elementor-widget-empty,.e-con>.elementor-widget-spacer.elementor-widget-empty{position:relative;min-height:22px;min-width:22px}.e-con-inner>.elementor-widget-spacer.elementor-widget-empty .elementor-widget-empty-icon,.e-con>.elementor-widget-spacer.elementor-widget-empty .elementor-widget-empty-icon{position:absolute;top:0;bottom:0;left:0;right:0;margin:auto;padding:0;width:22px;height:22px}Text fields: Insert the “Latitude”, “Longitude” and “Geofence Radius” (in meters) to define where your checkpoint will be located.
Map: Alternatively, you can make use of the map by following the steps mentioned below:
- Navigate (by right/left clicking on the map with the mouse and keeping it pressed) and zoom-in/out the map until you find the location of interest.
- Click on the centre of the area of interest (to define the Centre of the checkpoint Area)
- Move the mouse from the Centre of the checkpoint Area towards outside, until you reach the radius of your choice
- Check the “Geofence Enabled” checkbox
- Finally, press on “Save” button
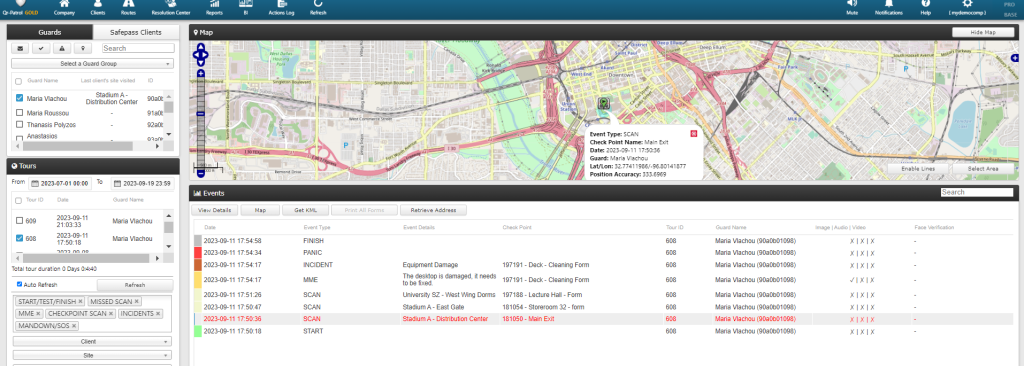
Geo-fencing on the target checkpoint has been set-up! Now, every time a Guard scans it, you can check whether the Guard was within or out of the defined area! This can be easily distinguished through the Events Browser, as it is highlighted in red.
- Select the target Scan Event highlighted in red from the Events Browser panel
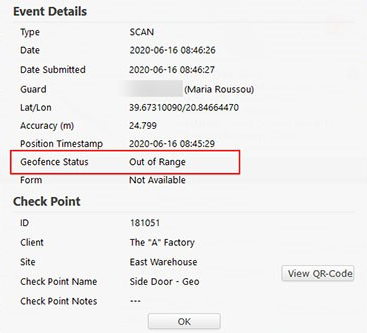
- Press on “View Details” button, to open a pop-up screen with details about the target Event
- Field “Geofence Status” will display one of the following values:
- Within Range (if the Guard location was within the set radius of the checkpoint scanned)
- Out of Range (if the Guard location was out of the radius of the checkpoint scanned)
- Disabled (if Geo-fencing for the checkpoint scanned is disabled)
Note: You can limit the Checkpoint Scan results on the Events Browser to check only the ones that are out of range; in order to achieve this, select both the “CHECKPOINT SCAN” and the “GEOFENCE – OUT OF RANGE” event type from the filter section (panel on the left).