Guard’s settings
Guard’s mobile login, using NFC tags
Αn alternative, simpler way for the Guards to login to the mobile application, other that the Guard IDs, is using NFC tag.
With this feature, the Managers can associate an NFC tag with a specific Guard/Worker that will allow them to quickly login to the mobile app by scanning it!
To set it up, follow the steps below:
- Navigate to Company -> Checkpoints
- Select the target NFC checkpoint from the list of available checkpoints, and press the “Edit” button
- On the pop-up window, select the target Guard from the drop-down list next to the “Guard Login” field
- Finally, press “Confirm”
Just open the QR-Patrol mobile app and at the Login page just approach the NFC Tag at the back of the device in order to read the Guard ID and press LOGIN.
Important Note: If a PIN exists for this Guard/Worker, they need to manually enter it before logging in.
/*! elementor - v3.15.0 - 20-08-2023 */ .elementor-column .elementor-spacer-inner{height:var(--spacer-size)}.e-con{--container-widget-width:100%}.e-con-inner>.elementor-widget-spacer,.e-con>.elementor-widget-spacer{width:var(--container-widget-width,var(--spacer-size));--align-self:var(--container-widget-align-self,initial);--flex-shrink:0}.e-con-inner>.elementor-widget-spacer>.elementor-widget-container,.e-con-inner>.elementor-widget-spacer>.elementor-widget-container>.elementor-spacer,.e-con>.elementor-widget-spacer>.elementor-widget-container,.e-con>.elementor-widget-spacer>.elementor-widget-container>.elementor-spacer{height:100%}.e-con-inner>.elementor-widget-spacer>.elementor-widget-container>.elementor-spacer>.elementor-spacer-inner,.e-con>.elementor-widget-spacer>.elementor-widget-container>.elementor-spacer>.elementor-spacer-inner{height:var(--container-widget-height,var(--spacer-size))}Edit Guard
To edit a Guard, you shall select one from the list of your company’s Guards. Click on “Edit”, which in turn will bring up a popup dialog displaying on the right.
You can now edit:
- The Guard’s Details
- The Mobile Application Settings
- Face Verification Management
By confirming the changes, they shall reflect in the list of Guards.
/*! elementor - v3.15.0 - 20-08-2023 */ .elementor-widget-image{text-align:center}.elementor-widget-image a{display:inline-block}.elementor-widget-image a img[src$=".svg"]{width:48px}.elementor-widget-image img{vertical-align:middle;display:inline-block} 
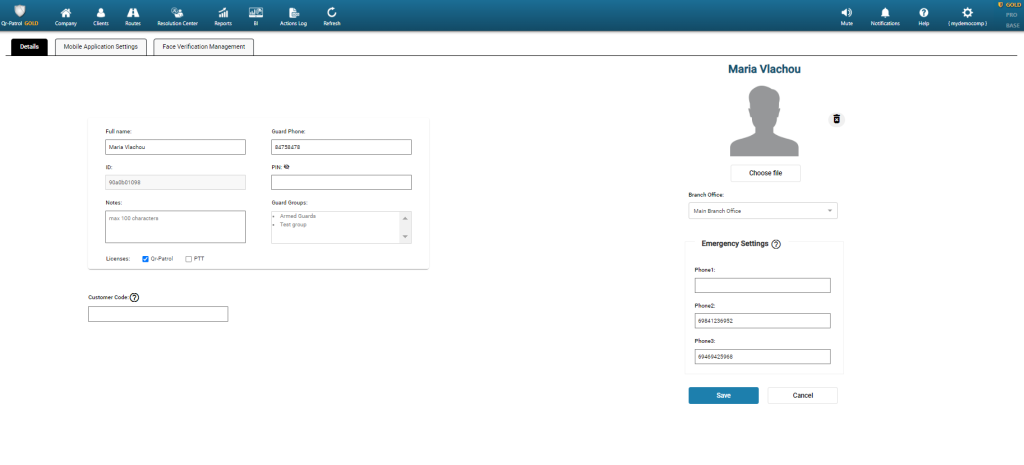
Guard’s Details
Define Full name/Guard Phone/Branch Office of the guard
Emergency Settings
Define up to 3 phone numbers that will receive an SMS notification in case this guard has pressed the SOS button and he is in danger

01
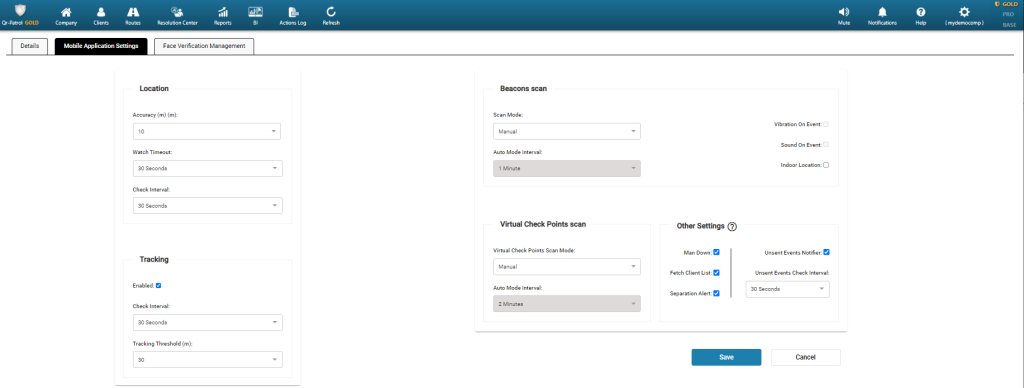
Location
Define the ideal location (accuracy) and how frequently the system will try to retrieve the Guard’s location via the GPS of his mobile device
02
Tracking
Track the last location of the last sent event of the guard on the map of the Events Browser
03
Beacon scan
Enable Beacons functionality and its settings for the guard
04
Virtual Check Points scan
Enable Virtual checkpoints functionality and its settings for the guard
05
Other Settings
- Man Down: Enable the Man Down functionality for the guard
- Fetch Clients List: Enable the option for Guards to view the Clients/Sites list in the mobile app. This is useful if you want the Guards to report Incidents/MMEs and Mobile Forms without scanning a physical checkpoint.