Import NFC checkpoints
You can import NFC checkpoints in two ways, just by following the steps below – (through the Mobile app is the easiest way):
/*! elementor - v3.16.0 - 14-09-2023 */ .elementor-column .elementor-spacer-inner{height:var(--spacer-size)}.e-con{--container-widget-width:100%}.e-con-inner>.elementor-widget-spacer,.e-con>.elementor-widget-spacer{width:var(--container-widget-width,var(--spacer-size));--align-self:var(--container-widget-align-self,initial);--flex-shrink:0}.e-con-inner>.elementor-widget-spacer>.elementor-widget-container,.e-con>.elementor-widget-spacer>.elementor-widget-container{height:100%;width:100%}.e-con-inner>.elementor-widget-spacer>.elementor-widget-container>.elementor-spacer,.e-con>.elementor-widget-spacer>.elementor-widget-container>.elementor-spacer{height:100%}.e-con-inner>.elementor-widget-spacer>.elementor-widget-container>.elementor-spacer>.elementor-spacer-inner,.e-con>.elementor-widget-spacer>.elementor-widget-container>.elementor-spacer>.elementor-spacer-inner{height:var(--container-widget-height,var(--spacer-size))}.e-con-inner>.elementor-widget-spacer.elementor-widget-empty,.e-con>.elementor-widget-spacer.elementor-widget-empty{position:relative;min-height:22px;min-width:22px}.e-con-inner>.elementor-widget-spacer.elementor-widget-empty .elementor-widget-empty-icon,.e-con>.elementor-widget-spacer.elementor-widget-empty .elementor-widget-empty-icon{position:absolute;top:0;bottom:0;left:0;right:0;margin:auto;padding:0;width:22px;height:22px} /*! elementor - v3.16.0 - 14-09-2023 */ .elementor-heading-title{padding:0;margin:0;line-height:1}.elementor-widget-heading .elementor-heading-title[class*=elementor-size-]>a{color:inherit;font-size:inherit;line-height:inherit}.elementor-widget-heading .elementor-heading-title.elementor-size-small{font-size:15px}.elementor-widget-heading .elementor-heading-title.elementor-size-medium{font-size:19px}.elementor-widget-heading .elementor-heading-title.elementor-size-large{font-size:29px}.elementor-widget-heading .elementor-heading-title.elementor-size-xl{font-size:39px}.elementor-widget-heading .elementor-heading-title.elementor-size-xxl{font-size:59px}Through the Mobile app
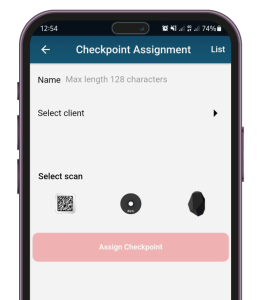
- On the main screen of QR-Patrol mobile application, press the “Checkpoint Assignment” button
- Drag the NFC tag on the back of your device (make sure that the NFC feature of your phone is enabled).
- Select the Client and Site (in order for the Client list to be available for the Guard, you need to enable “Fetch Client List” option from the Guard’s settings in the web app) you want to assign the checkpoint at and press “Assign”.
Through the Web app
- Login to your web app account and navigate to Company >> Checkpoints
- Press “Add NFCs”
- Choose one of the following options to import your NFCs*:
a) The “File” option allows you to upload a text file (.txt) that includes your NFCs
b) With the “Clipboard” option, you simply paste the serial numbers of your NFCs on the available text area
- Select the “Branch” you want to assign them to by using the respective button on the right
- Press “Upload” to complete your import!
* The format you need to use, whether you chose the “File” or “Clipboard” option is the following:
For multiple NFCs import, you simply add their serial numbers divided by commas ( , ). For example: 041D1F9A8E6581, 04D94F9A8E6580. In this example, 2 NFCs will be added to the account.
If you want to also name your NFCs upon import, simply add the serial number followed by a semicolon ( ; ) and the name you want to add. For example: 041D1F9A8E6581; Warehouse Side Door, 04D94F9A8E6580. In this example, 2 NFCs will be added to the account – the first one will be named “Warehouse Side Door” and the second one will be added without a predefined name.