Schedules are the scheduled patrols (guard tours) assigned to each guard. A schedule is a predefined guard tour, which includes specific checkpoints that should be scanned between a specific time interval.
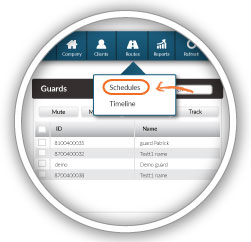
You can access the Schedules panel by clicking on the top Navigation Bar on the “Routes” tab, and selecting “Schedules (New)” as shown on the right image.
/*! elementor - v3.16.0 - 14-09-2023 */
.elementor-widget-image{text-align:center}.elementor-widget-image a{display:inline-block}.elementor-widget-image a img[src$=".svg"]{width:48px}.elementor-widget-image img{vertical-align:middle;display:inline-block}
/*! elementor - v3.16.0 - 14-09-2023 */
.elementor-column .elementor-spacer-inner{height:var(--spacer-size)}.e-con{--container-widget-width:100%}.e-con-inner>.elementor-widget-spacer,.e-con>.elementor-widget-spacer{width:var(--container-widget-width,var(--spacer-size));--align-self:var(--container-widget-align-self,initial);--flex-shrink:0}.e-con-inner>.elementor-widget-spacer>.elementor-widget-container,.e-con>.elementor-widget-spacer>.elementor-widget-container{height:100%;width:100%}.e-con-inner>.elementor-widget-spacer>.elementor-widget-container>.elementor-spacer,.e-con>.elementor-widget-spacer>.elementor-widget-container>.elementor-spacer{height:100%}.e-con-inner>.elementor-widget-spacer>.elementor-widget-container>.elementor-spacer>.elementor-spacer-inner,.e-con>.elementor-widget-spacer>.elementor-widget-container>.elementor-spacer>.elementor-spacer-inner{height:var(--container-widget-height,var(--spacer-size))}.e-con-inner>.elementor-widget-spacer.elementor-widget-empty,.e-con>.elementor-widget-spacer.elementor-widget-empty{position:relative;min-height:22px;min-width:22px}.e-con-inner>.elementor-widget-spacer.elementor-widget-empty .elementor-widget-empty-icon,.e-con>.elementor-widget-spacer.elementor-widget-empty .elementor-widget-empty-icon{position:absolute;top:0;bottom:0;left:0;right:0;margin:auto;padding:0;width:22px;height:22px}
/*! elementor - v3.16.0 - 14-09-2023 */
.elementor-heading-title{padding:0;margin:0;line-height:1}.elementor-widget-heading .elementor-heading-title[class*=elementor-size-]>a{color:inherit;font-size:inherit;line-height:inherit}.elementor-widget-heading .elementor-heading-title.elementor-size-small{font-size:15px}.elementor-widget-heading .elementor-heading-title.elementor-size-medium{font-size:19px}.elementor-widget-heading .elementor-heading-title.elementor-size-large{font-size:29px}.elementor-widget-heading .elementor-heading-title.elementor-size-xl{font-size:39px}.elementor-widget-heading .elementor-heading-title.elementor-size-xxl{font-size:59px}
Schedules

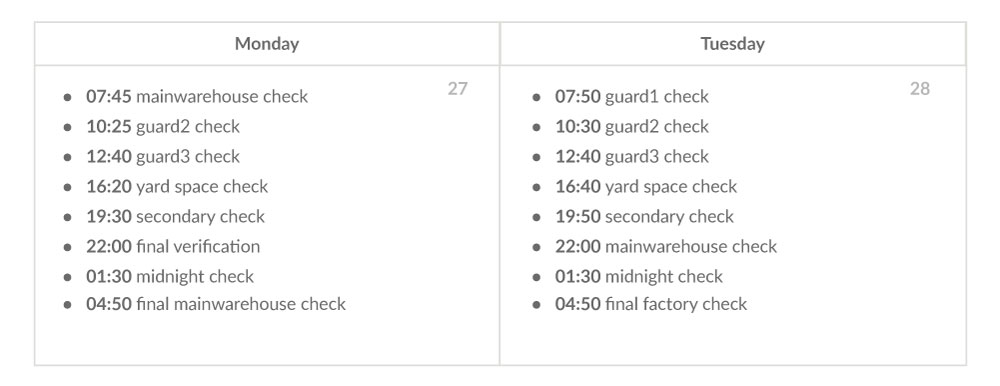
On the upper left Schedules panel (Day, Week, Month), you have the option to choose the respective View for your Schedules. The default View is the Month view. You can also see a daily list of your Schedules, by pressing the List button.*Draft/Past Schedules appear in grey color , whereas Activated Future Schedules appear in blue.
Add a schedule
To add a Schedule, press on the Add button available on the upper right Schedules panel.
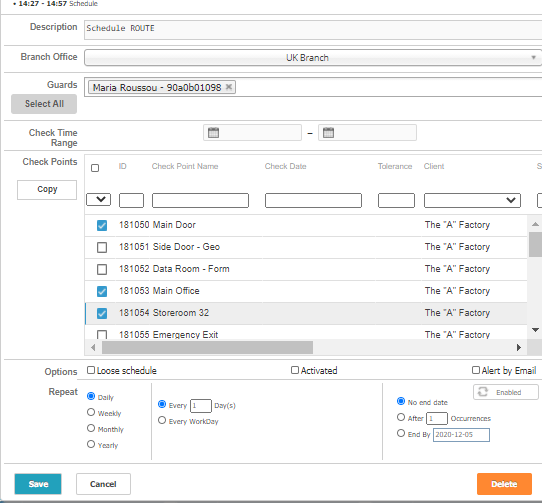
You can now define a description (name) for this Schedule, one or more guards to accomplish it, as well as all the necessary checkpoints, time intervals and options regarding the route.
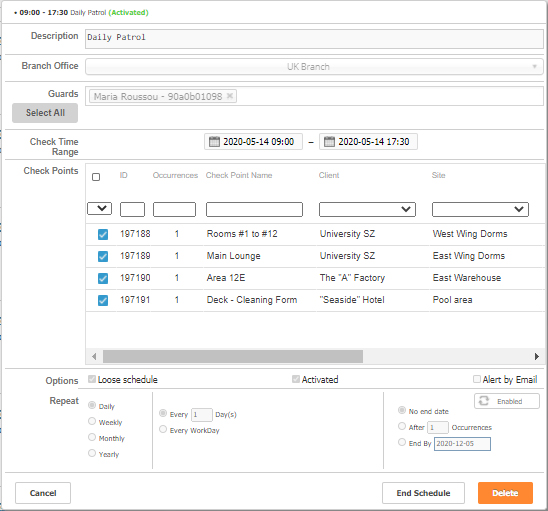
Loose Schedule
On a Loose Schedule, you don’t specify the Scanning Time per Checkpoint, rather you define the Scanning Time Range for the whole Schedule.
-
Check the Loose Schedule checkbox
-
Select the Checkpoints that you wish to include, by clicking on the respective checkboxes
-
If you wish to add the same checkpoint multiple times, double click on the “Occurrences” column and insert the value of your choice
-
Finally, select the Time Range that you wish your schedule to last
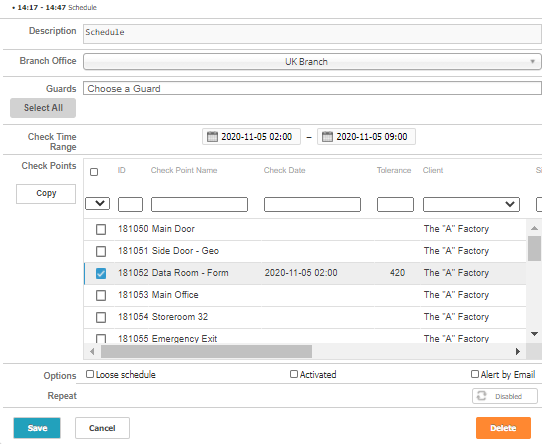
Strict Schedule
On a Strict Schedule, each Checkpoint has a specific Scanning Time Range.
-
Select a Checkpoint that you wish to include,
-
Select the scanning Time Range that you wish for, for the target checkpoint
-
If you wish to add the same checkpoint multiple times, you can do this by selecting it and then pressing on the Copy button
-
Repeat this process until you’ve added all the checkpoints that you want!
/*! elementor - v3.16.0 - 14-09-2023 */
.elementor-widget-divider{--divider-border-style:none;--divider-border-width:1px;--divider-color:#0c0d0e;--divider-icon-size:20px;--divider-element-spacing:10px;--divider-pattern-height:24px;--divider-pattern-size:20px;--divider-pattern-url:none;--divider-pattern-repeat:repeat-x}.elementor-widget-divider .elementor-divider{display:flex}.elementor-widget-divider .elementor-divider__text{font-size:15px;line-height:1;max-width:95%}.elementor-widget-divider .elementor-divider__element{margin:0 var(--divider-element-spacing);flex-shrink:0}.elementor-widget-divider .elementor-icon{font-size:var(--divider-icon-size)}.elementor-widget-divider .elementor-divider-separator{display:flex;margin:0;direction:ltr}.elementor-widget-divider--view-line_icon .elementor-divider-separator,.elementor-widget-divider--view-line_text .elementor-divider-separator{align-items:center}.elementor-widget-divider--view-line_icon .elementor-divider-separator:after,.elementor-widget-divider--view-line_icon .elementor-divider-separator:before,.elementor-widget-divider--view-line_text .elementor-divider-separator:after,.elementor-widget-divider--view-line_text .elementor-divider-separator:before{display:block;content:"";border-bottom:0;flex-grow:1;border-top:var(--divider-border-width) var(--divider-border-style) var(--divider-color)}.elementor-widget-divider--element-align-left .elementor-divider .elementor-divider-separator>.elementor-divider__svg:first-of-type{flex-grow:0;flex-shrink:100}.elementor-widget-divider--element-align-left .elementor-divider-separator:before{content:none}.elementor-widget-divider--element-align-left .elementor-divider__element{margin-left:0}.elementor-widget-divider--element-align-right .elementor-divider .elementor-divider-separator>.elementor-divider__svg:last-of-type{flex-grow:0;flex-shrink:100}.elementor-widget-divider--element-align-right .elementor-divider-separator:after{content:none}.elementor-widget-divider--element-align-right .elementor-divider__element{margin-right:0}.elementor-widget-divider:not(.elementor-widget-divider--view-line_text):not(.elementor-widget-divider--view-line_icon) .elementor-divider-separator{border-top:var(--divider-border-width) var(--divider-border-style) var(--divider-color)}.elementor-widget-divider--separator-type-pattern{--divider-border-style:none}.elementor-widget-divider--separator-type-pattern.elementor-widget-divider--view-line .elementor-divider-separator,.elementor-widget-divider--separator-type-pattern:not(.elementor-widget-divider--view-line) .elementor-divider-separator:after,.elementor-widget-divider--separator-type-pattern:not(.elementor-widget-divider--view-line) .elementor-divider-separator:before,.elementor-widget-divider--separator-type-pattern:not([class*=elementor-widget-divider--view]) .elementor-divider-separator{width:100%;min-height:var(--divider-pattern-height);-webkit-mask-size:var(--divider-pattern-size) 100%;mask-size:var(--divider-pattern-size) 100%;-webkit-mask-repeat:var(--divider-pattern-repeat);mask-repeat:var(--divider-pattern-repeat);background-color:var(--divider-color);-webkit-mask-image:var(--divider-pattern-url);mask-image:var(--divider-pattern-url)}.elementor-widget-divider--no-spacing{--divider-pattern-size:auto}.elementor-widget-divider--bg-round{--divider-pattern-repeat:round}.rtl .elementor-widget-divider .elementor-divider__text{direction:rtl}.e-con-inner>.elementor-widget-divider,.e-con>.elementor-widget-divider{width:var(--container-widget-width,100%);--flex-grow:var(--container-widget-flex-grow)}

01
Fill in the rest information so as to complete your Schedule
02
Select how often you wish your Schedule to be repeated and when you wish those recurrences to stop!
03
Το save your Schedule as draft, leave Activated checkbox un-checked. To activate your Schedule, check the Activated checkbox. Activated Schedules cannot be altered afterwards!
04
Finally press on Save button!
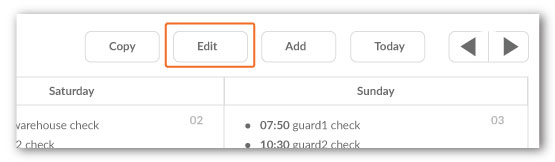
Edit schedule
To Edit a Schedule, click on it and press on the Edit button, available on the upper right Schedules panel.
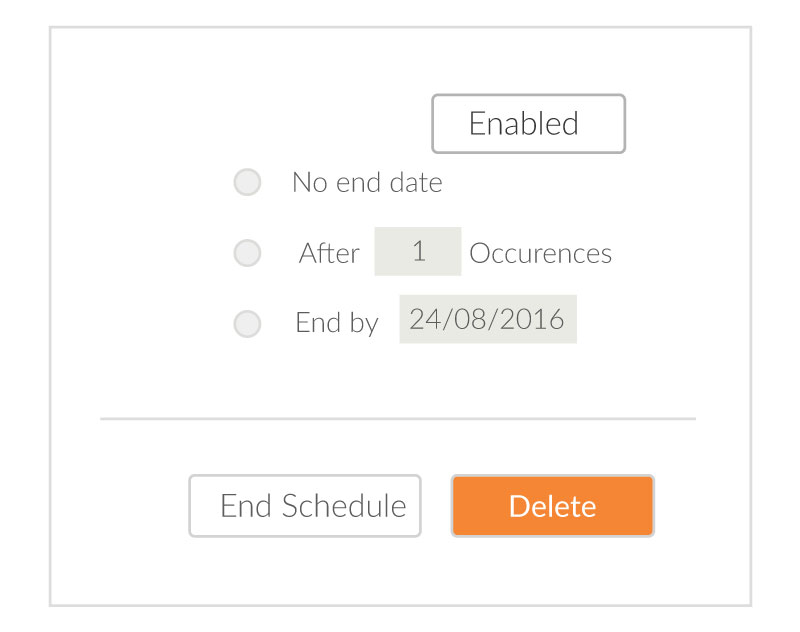
For Non-Activated Schedules, you can make any amendment you wish. For Activated Schedules, you have 2 options:
-
End Schedule: The Schedule won’t occur again
-
Delete Schedule: The Schedule won’t occur again and all past occurrences will be removed
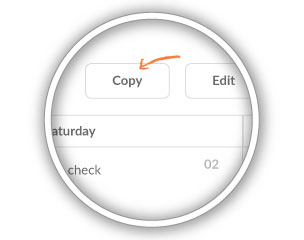
Copy schedule
To Copy a Schedule, click on it and press on the Copy button, available on the upper right Schedules panel. The pop-up page displays a copy of the target schedule, in order to edit it as you wish.
The Activated checkbox is always un-checked to Copied Schedules, so make sure you check it if you wish to activate your new (copied) Schedule!
*Copy function is especially useful for making changes to Activated Schedules: Copy the target Schedule, perform any desired updates (make sure you press on Activated checkbox after you are done with all the changes!) and Save it! Don’t forget to also End the Old Schedule!
Video Tutorial
By watching the video tutorial, you will be able to learn how to easily manage your schedules using the new advanced web application schedule interface!
https://www.youtube.com/watch?v=86EKfoVCbck