

Mobile Forms can be used to send instructions/questionnaires to your employees, ask them questions, or even let them freely fill in any comments or information related to specific Checkpoints/ Sites, they want to share with the monitoring center!
You have total control over Mobile Forms creation, as they are fully customizable.
A Mobile Form can consist of 6 Element types:
- Header (Read only – can be used to name the form for instructions/tasks addressed to the guard, or other information the manager would like to add)
- Text Input (Single-line input – can be used for short comments/information the employee would like to share with the Monitoring center)
- Image (Read only – can be used to add an image for display purposes)
- TextArea (Multi-line input – can be used by the employee for more detailed reporting)
- Radio (Can be used for single choice selections)
- Checkbox (Can be used for multiple choice selections). Select (Dropdown list – can be used for single choice selections)

Adding a new form
- Press Company -> Mobile Forms
- Press on “+Add” button displayed on top left of the Mobile Forms list; the system opens a new page to add a new Mobile Form
STEP 1
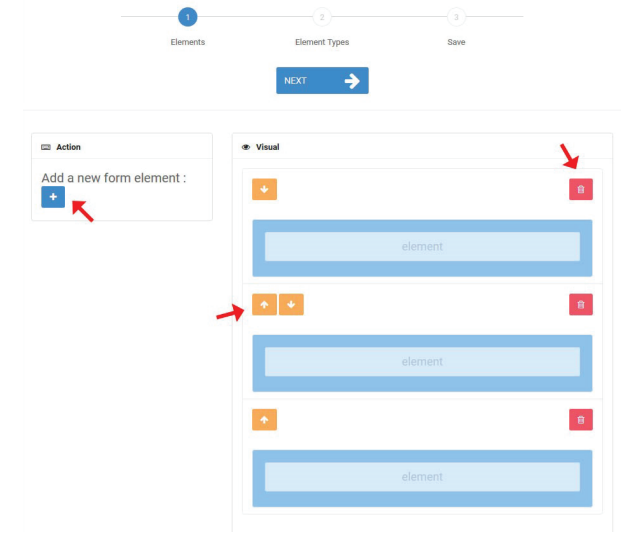
STEP 2

- Header: “Header Text”, “Description”
- Image: “Choose file”
- Text Input: “Label text”, “Placeholder”, “Required”, “Description”
- TextArea: “Label text”, “Required”, “Description”
- Radio: “Add new radio”, “Edit/Remove radio”, “Label text” “Required ”, “Description”
- Checkbox: “Label text”, “Required”, “Description”
- Select: “Add new options”, “Edit/Remove options”, “Label text”, “Required”, “Description”

Refer to the list if you require further instructions for each Property
STEP 3
- Preview and Save the Form: On the final screen, you can see a preview of your new Mobile Form Note: Don’t worry, if you don’t like something you can always go back and change it!
- Add a Name for your Mobile Form, by filling the respective field on the left and- Finally, press “Save this Form”

Once you have created your form, you have to assign checkpoint(s) to it: this way the Mobile Form will appear to the Guards when scanning it, in order to fill-it!
You can assign checkpoints to a Mobile Form by following the steps below:
While on the Mobile Forms page, press on the “Assigned Checkpoints” button Under Actions column; the system opens a pop-up page with the Company’s checkpoints.


Allow the Guard to send a Mobile Form without physically scanning a checkpoint
- Access your Guard’s settings by navigating to menu “Company” >> “Guards”
- Select and edit the Guard of your interest
- Enable the “Fetch Client List” option

View Mobile Forms Answers (Filled-out Forms)
You can check the answered Mobile Forms on the Events Browser either one by one (option 1) or in bulk (option 2):
- Select the target Checkpoint Scan Event from the Events Browser panel
- Press on "View Details" button, to open a pop-up screen with details about the target Scan Event
- Field "Form" will display one of the following values:
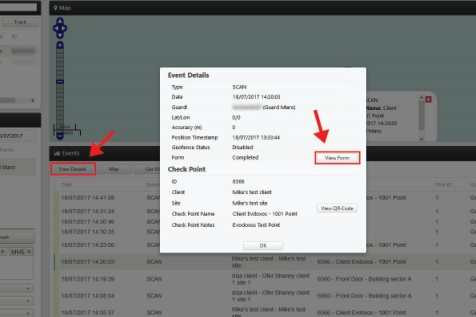
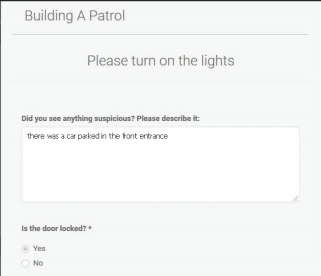
- Completed (in such case, you can see the Guard’s filled-in details by pressing on the “View Form” button)
- Not Completed (if the Guard performed the checkpoint scan but skipped filling the Form)
- Not Available (if the checkpoint is not associated with any Form)
You can now check the guard’s reply in a pop-up window and proceed with your work.
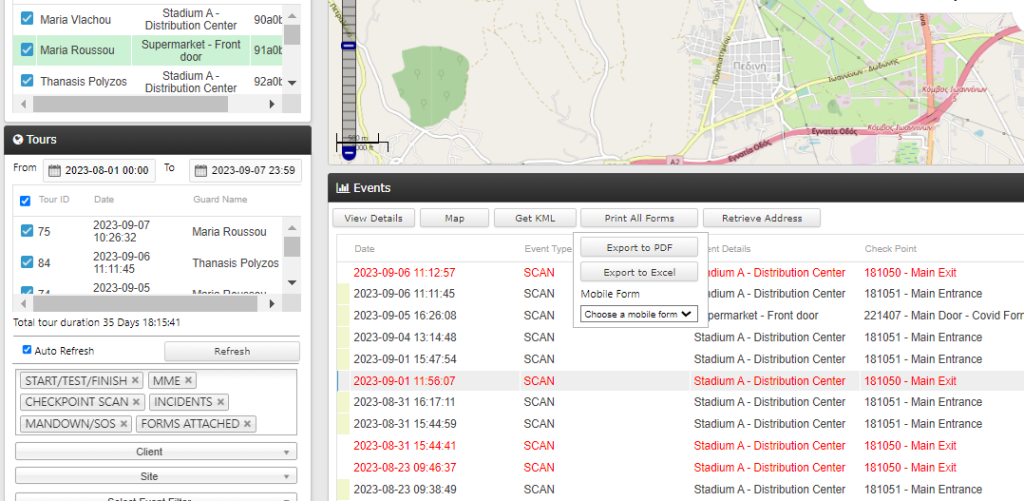
Alternatively, you can export all the submitted Mobile Forms in bulk or all the responses of a specific Mobile Form, by following the steps below:
1) Go to the Events Browser and select the related Guard(s) and Tour(s)
2) Add the “FORMS ATTACHED” filter by pressing on the filters tab of the Events Browser in order to get on the left side all the Scan Events that include a submitted Mobile Form
3) On the left, there will be available the “Print All Forms” button. By pressing on it, you have the following options:
i) “Export to PDF“: export all the submitted, filled-in Mobile Forms to a PDF file
ii) “Export to Excel“: export all the submitted, filled-in Mobile Forms to an Excel file
iii) “Choose a mobile form“: select a specific Mobile Form for which you would like to extract all relevant submitted responses
The Guards’ IDs can be found on the Web app, under “Company” -> “Guards” tab.
Through this app, they can simply submit different types of Events like (Scan, Incidents, and MME and send them in real-time to the Web app. The Guard has also the ability to press the SOS button in case he is in an emergency, in order for the manager to be informed asap.
Every sent event from the Mobile application will be uploaded in real-time to the web application via the internet, either via Wi-Fi or via mobile data.


