

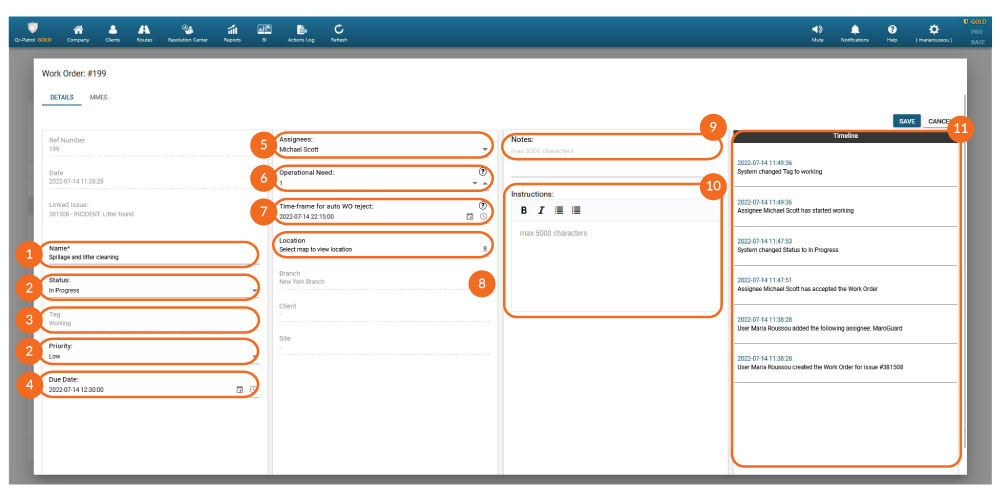
01
Name
To change the “Name” of the WO, click on the field and add your preferred name.02
Status/Priority
To change the “Status”/“Priority”, click on the dropdown menu and select the one that meets your needs. To reset the Priority, select the blank option on the dropdown menu.
The available Statuses are the following: Open, In Progress, Cancelled or Closed.
“Closed” WOs can be reopened by changing the Status to “Open”. In this case, any tags will be removed, and the system will also remove any Assignees that have Rejected or Aborted this WO, but you can reselect them if you want to reassign them to it. You can re-send it to Assignees by pressing “Save”.
03
Tag
Tags are automatically set by the system in order to indicate the WO’s latest state; because of that, they are non-editable by managers.
The available tags are the following:
- Unassigned: This WO is not assigned to any Assignees
- Assigned: This WO is assigned to at least 1 Assignee
- Rejected: This WO is Rejected by all its Assignees
- Working: At least 1 Assignee has declared that they have started “Working” on this WO
- Completed *: At least 1 Assignee has declared that they have “Completed” this WO
- Aborted: This WO is Aborted by all its Assignees, or it has been both Rejected and Aborted by all Assignees
* WOs marked as “Completed” by the Assignees, can be Reopened by managers by pressing on the “Reopen” button. In this case, any tags will be removed, and the system will also remove any Assignees that have Rejected or Aborted this WO, but you can reselect them if you want to reassign them to it. You can re-send it to Assignees by pressing “Save”.
04
Due Date
To change the “Due Date”, click on the calendar icon and select the Due Date of your preference. You can also edit the date & time manually, by clicking on the field and writing down your date & time of preference.05
Assignees
Assignees are the people that will receive this WO and will be able to Accept or Reject it. Assignees that accept the WO, can complete the work assigned through this WO.
To add Assignees to your WO, press on the field and select one, more, or a Group of them from the dropdown menu.
06
Operational Need
To define the “Operational Need”, press on the up or down arrow depending on the number you want to set, or click on the field and type down your preferred choice.
“Operational Need” indicates the number of people that are actually needed in order to
complete the work. This allows for flexibility in assignment: you can assign multiple people in the “Assignees” field if you are unsure of whom is available to complete it and the Operational Need will be covered when the set number is fulfilled. If the Operational Need is not covered for some reason, you will have a “Needs attention” indication on the grid. See more under section “Needs attention” in Work Orders Tab.
For example, if 2 people are required in order for this work to be completed, you can set the “Operational Need” to 2. As you are unsure of whom is available at the moment in order to complete it, but you know that 6 people work today, you decide to add all 6 people in the “Assignees” in order for the ones available to accept it.
The first 2 people that will accept the WO (based on the number set for the “Operational Need”), will be the ones that the WO will actually be assigned to, in order to complete it.
07
Timeframe for auto WO reject
“Time frame for auto WO reject”, is used to define the date/time when a WO will be automatically rejected by the system if an assignee has not accepted it until then. This is useful in order for the manager to quickly take action if it is not accepted by the preferred time.
To define the “Time frame for auto WO reject”, click on the calendar icon and select the date of your preference. You can also edit the date & time manually, by clicking on the field and writing down your date & time of preference.
08
Location
WOs by default carry the linked Issue’s location (if any) – i.e., the Guard/Worker’s location the time they reported the Issue.
To view the location of where a WO should be conducted from, click on the location pin under “Location”.
To change the location, enable “Custom location” checkbox and click anywhere on the map.
The Assignees of this WO will be able to see the location they should go to on the map in their mobile application.
09
Notes
Press on the “Notes” field to add internal notes for this WO (additional information, internal guidelines etc.). These notes are only visible within the web application, between managers.10
Instructions
Instructions can be used to help your Assignees understand what they need to do in order to complete the work required for this WO.
To add “Instructions” to your WO, click on the “Instructions” field and type the instructions.
Use our editor to add simple format like bold text and bullet points, to have more structured and easier to follow instructions for your Assignees.
11
Timeline
Under “Timeline”, you can view detailed historical logs for any changes made for this WO, such as Status changes and Notes, as well as responses by Assignees. All logs include the date and time a change took place, as well as who made it.
Press “Save” to save your changes, or “Cancel” to close the WO window without saving.


