

01
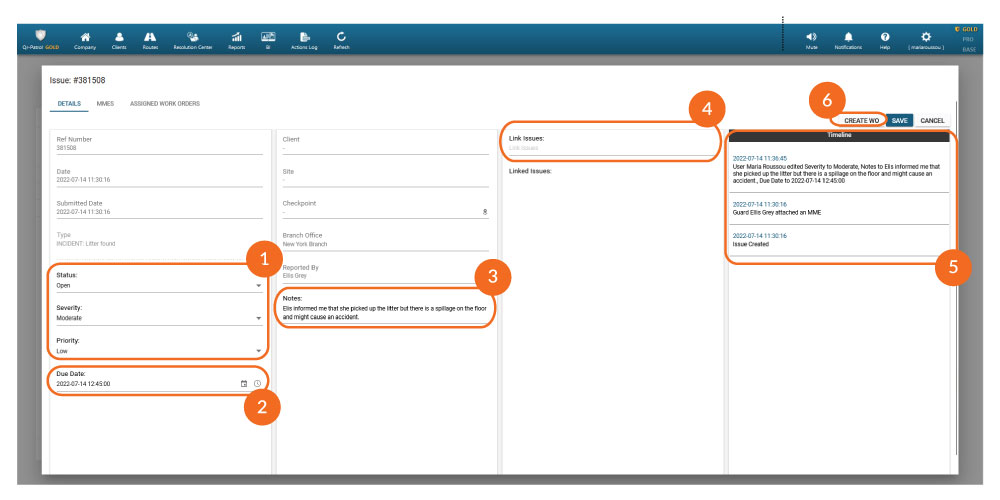
Status/Severity/Priority
To change the “Status”/“Severity”/“Priority”, click on the dropdown menu and select the one that meets your needs.
The available Statuses are the following: Open, In Progress, Ignored or Closed. All Issues by default are set to “Open”.
The available Priorities are the following: High, Medium, Low.
To reset the Severity/Priority, select the blank option on the dropdown menu.
02
Due Date
To change the “Due Date”, click on the calendar icon and select the Due Date of your preference. You can also edit the date & time manually, by clicking on the field and writing down your date & time of preference.03
Notes
Press on the “Notes” field to add internal notes for this Issue (e.g. Root cause, additional information etc.). These notes are only visible within the web application, between managers.04
Link Issues
If more than one Issues are related, you can link them together to show their relation.
To link one ore more other Issues with your Issue, press on the “Link Issues” field and select the one(s) you want to link from the dropdown menu. If you are unsure which one of the dropdown options is the Issue you want to make a linkage with, check its Ref number.
Issues linked together appear under “Linked Issues” and you can quickly navigate to one of them by clicking on it.
05
Timeline
Under “Timeline”, you can view detailed historical logs for any changes made for this Issue, such as Status changes, Notes and Linkages, as well as WOs created for this Issue. All logs include the date and time a change took place, as well as who made it.06
Create WO through an Issue
Press “Create WO” to create a new Work Order that will be assigned to this Issue. For
information on how to create a WO, refer to “WOs Details Tab” section.
Press “Save” to save your changes, or “Cancel” to close the Issue window without saving.


