For each client, you can schedule automatic sending (via email) of reports on a daily, weekly or monthly basis.
You can schedule (for automatic email sending):
1. Client Events Reports and
2. Incidents Reports
The system generates and sends the defined reports according to the recurrence you have set, to the email addresses available for the target Client (i.e. including the “Additional Recipients” emails).
Adding a new Scheduled email Report
You can add a new scheduled email report by following the steps below:
1. Press “Clients”, on the main top panel
2. Select the target client and press on the “Edit” link on the top panel
3. Press on “Add” link displayed on “Scheduled e-mail Reports” panel; the system opens a pop-up page to add the details of the automatic report:
Name: add a description for the automatic report
NOTE: This will be used for distinguishing the reports for this client – the Client will not be able to see this kind of information
Type: define the automatic report type (Client Events report or Incident report)
First Run: define when the automatic report should be first run (when this automatic report should be sent for the first time)
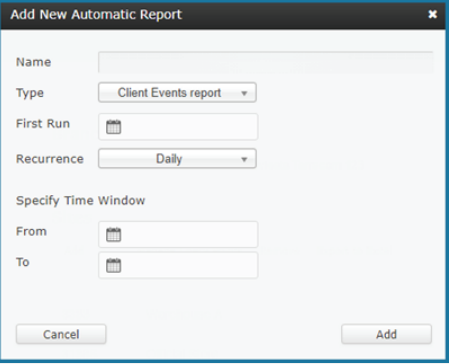
Recurrence: define whether the automatic report should be sent on a Daily, Weekly or Monthly basis (i.e. every day, once per week or once per month)
Specify Time Window (From: To:): define the time period that the generated report should include
Some Examples
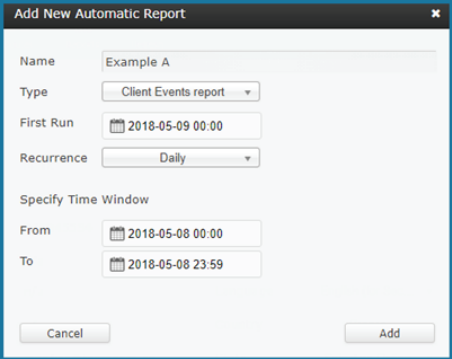
Example A
Daily Client Events report to be sent every day at 00:00am, starting the next day (first run Day2 00:00am), with a time window of the past 24hours (From Day1 00:00am To Day1 23:59pm):
For example, let’s say that today is May 08, 2018; for the client to receive the first automatic report tomorrow, then you need to set the “First Run” at May 09, 2018. Since every day your client would like to receive a report for the previous day, then the Time Window you need to set is: From: May 08, 2018 00:00am, To: May 08, 2018 23:59pm.
This way you can have daily Client Events reports containing all Events sent the previous day.
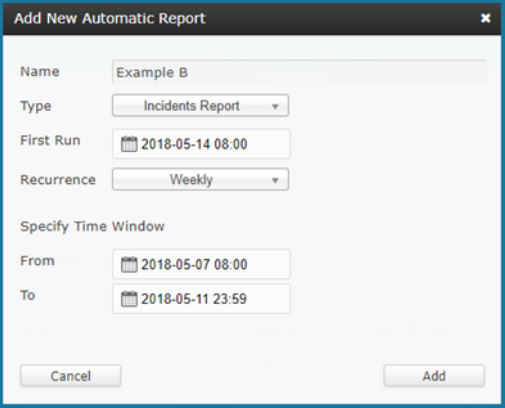
Example B
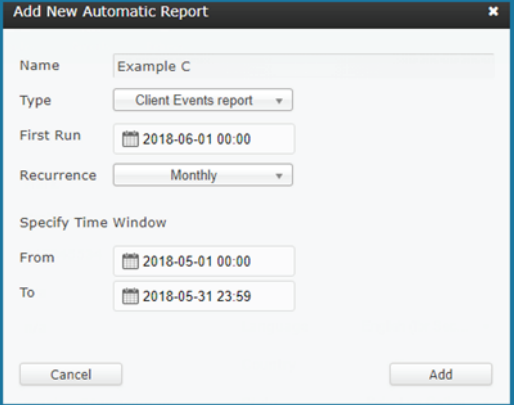
Example C
Example D
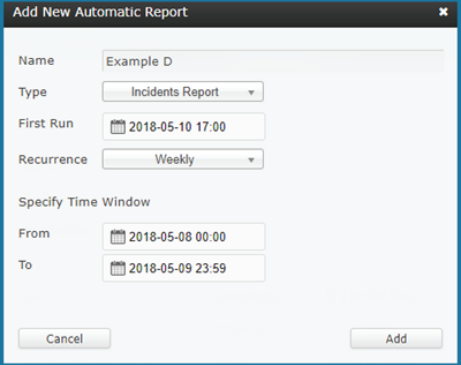
Weekly Incidents report to be sent every Thursday at 17:00pm, starting from next Thursday (first run next Thursday 17:00pm) with a time window of the past 2 days (next Tuesday 00:00am, next Wednesday 23:59pm):
As you can see you have total control of the automatic report you create, so as to match each Client’s unique specifications!
- Press on “Add” button to save your new scheduled email report, or “Cancel” otherwise.
Removal of a Scheduled email Report
You can remove an existing scheduled email report anytime, by following the steps below:
1. While on the Web Application, press on Clients on the main top panel
2. Select the target client and press on the “Edit link” on the top panel
3. On “Schedules e-mail Reports” panel, select the target scheduled automatic report and press on “Remove” link; the system displays a confirmation message for the deletion of the automatic report
4. Press on “Confirm” button; the system removes the target automatic report.


