Setting Up Beacons for Indoor Location

image_pdfimage_print

Use case of a small office

Option A - Small Office - General Location Range (3m-9m) - Use of 3 beacons.

To begin with, we choose the longest building side to place the first beacon (in this example named “side A”.
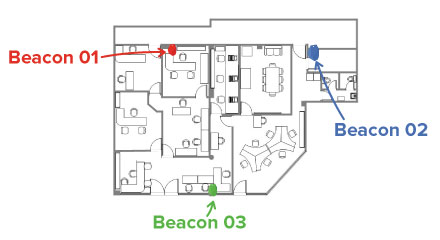
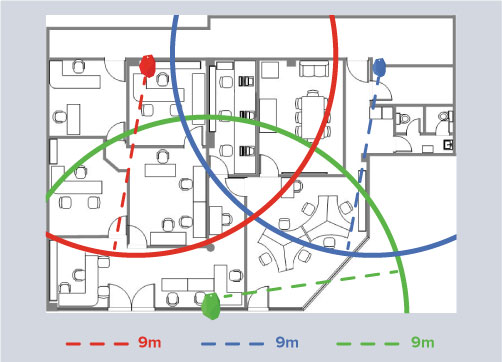
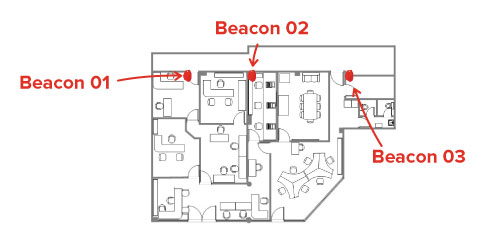
We need to decide about the physical placing of the beacons. A general suggestion is not to place them in corners (i.e. in this example in corners of side A), in order to achieve better coverage with smaller number of beacons. Side “A” is almost 20 m. Thus, the range of the beacon should be set to under 20 m – our selection depends mostly on the accuracy we would like to achieve – we also plan to use two beacons on Side A, thus the range value should be around 10m. The beacon manufacturer allows setting of transmit range from the following set of values {0.25m, 3.5 m, 7m, 15m, …}. Having in mind our rule (“choose the transmission power (actual target value) that fits your needs in the Beacon supplier application but we also recommend to set the desired beacon accuracy in the web app (i.e. https://followmystaff.com/) by inserting a value that corresponds to 20% more than your actual target value”), we set the beacon transmit range to 7m and we set the Geofence radius in the web app at 9m (https://followmystaff.com/).

01

So, first beacon (“Beacon01”) has to be placed at around the half of the range of 9m (i.e. of the real range value as explained above) i.e. around 4,5m from the start of side A. For that reason and always having in mind the office architecture (at 4,5m there is a physical obstacle), we choose to place Beacon01 around 6m from the top left corner (start of side A).

02

The second beacon (“Beacon02”) will have the same transmit range as “Beacon01”. It has to be placed on the same side (side A) but having a maximum distance of 18 m (i.e. of the sum of their Geofence radius) from Beacon01 – otherwise an area within those two beacons would be left without coverage by any of them:
Additionally, it is better to have it in distance greater than 9m (i.e. the beacons Geofence radius) from “Beacon1”.

03

So far, we have addressed coverage for side A, but the area near “side B” has no coverage by any beacon. Notice that “side B” is much shorter than “side A”: thus we can cover it by using only one beacon around the middle of that side (side B) and setting its beacon transmit range to 7m (Geofence radius 9m).

Final step is to set the beacon values on the web application (refer to section C.2. Set Indoor location Beacons – Web application above). The desired beacon accuracy for all three beacons should be 9m (i.e. the desired range value).

The end result will look as depicted bellow:

Note how the office has full coverage and various defined areas within. Now, the system will be able to track the guard position when they are within those areas, offering you a pretty accurate view of their location!

Option B – Small Office - General Location Range (1,8m-5m) – Better precision - Use of 7 beacons

Let us again consider side A and side B:
We need to choose the transmit power of each beacon: As mentioned before the values set through the manufacturer application are a bit more in reality, for that reason we suggest to calculate each distance by 20% more. Having that in mind and also aiming to achieve better precision, we choose to transmit in a range of 3.5m (will correspond to almost 5m in reality).

01

Using the same rationale as before, first beacon (“Beacon01”) has to be placed at around the half of the range of 5m (i.e. of the real range value as explained above). Having in mind also the office architecture, we choose to place Beacon01 around 3m from the top left corner (start of side A). The second beacon (“Beacon02”) will have the same transmit range as “Beacon01”. It has to be placed on the same side (side A) but having a maximum distance of 10 m (i.e. of the sum of their Geofence radius) from Beacon01. Additionally, it is better to have it in distance greater than 5 m (i.e. the beacon’s Geofence radius) from “Beacon1”.

02

Next beacon (“Beacon02”) has to be set on the same side but at least 5m until 10m from the first beacon. “Beacon02” will have the same radius with “Beacon01” and for that reason it has to be at a distance of that radius until the double. In other case there will be a field without being covered by any beacon.

03

Using the same rationale we also place “Beacon03” on side A (same transmit range and Geofence radius as Beacons01, 02); the result so far can be depicted in the image below:

04

In order to physically place the next beacons, we take into account the fact that the distance between “side A” and “side B” is greater than 10m (almost 12m); thus, we could not place them to “side B”, but we have to set at least another two beacons to almost the middle of the distance (the same rules we used before apply here as well in order to decide where to place them).

05

Similarly, we place another two beacons on “side B”.
Final step is to set the beacon values on the web application (refer to section C.2.). The end result in terms of coverage is depicted in the following image:
Note how the office has again full coverage but a greater number of (and smaller/more accurate) defined areas within. The system can track the guard position when they are within those areas, offering you an even more accurate view of their location!
Go to Top