B1. Unique ID & Advertising Interval
After placing the beacons (having in mind their transmission power), then you have to prepare them, by setting a unique ID value as well as defining their advertising interval.
QR-Patrol supports both ibeacon (made by Apple) and eddystone (made by Google) beacon protocols.
- For ibeacon protocol this ID must be a unique combination of UUID, major and minor values. We suggest that you keep UUID value the same for all beacons, and that you distinguish them by setting different value to one (both) of the major/minor values.
- For eddystone protocol, the ID must be a unique combination of namespace ID (nid) and beacon ID (bid).
B2. Transmission Power
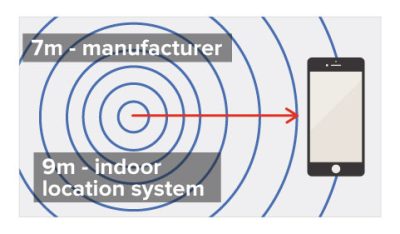
It is often the case that the transmission power values do not correspond to real use, i.e. in reality the transmission power is higher than what you have defined. In most manufacturers we tested, it is around 20% more. So, we suggest choosing the transmission power (actual target value) that fits your needs in the Beacon supplier application but we also recommend setting the desired beacon accuracy in the web app (i.e. https://followmystaff.com/) by inserting a value that corresponds to 20% more than your actual target value, under Checkpoints -> Edit Beacon -> “Geofence Radius” field. For example, if you wish to have a transmission power of 3,5m in the Beacon range, you should set the Geofence Radius of the beacon to around 5m in the web application (followmystaff.com), while if you wish to have around 7m transmission power the value you should set in Geofence Radius of the beacon is around 9m. That impairs the precision of user’s location but the results are trustworthy.
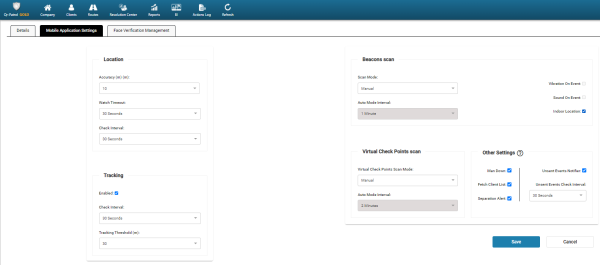
C. Set Indoor location Beacons – Web application
For each beacon (ibeacons and eddystone beacons types are both supported) you will use for indoor location, follow the steps below:
Next, you need to mark the beacon checkpoint as “indoor”:
- While under Company Checkpoints, press on Edit for the target beacon
- Set the exact coordinates of its physical location (latitude and longitude)
- Enable Geofence and set the desired beacon accuracy by inserting the corresponding value under “Geofence Radius” field (i.e. 20% more than transmission power of beacon, see section B.2 above)
- Enable indoor feature for that beacon
- Press on Confirm button to save your changes
You also need to enable indoor location feature and tracking for each guard, by following the steps below:
Company -> Guards -> Edit a specific guard
– Enable tracking with the interval of your preference
– Enable indoor location feature